
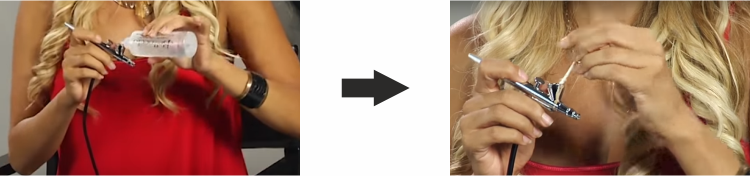
To give any equipment and machine a long and durable life it is very important to take good care of them. Every machine requires cleaning after certain hours of works. On similar grounds, it is very important to alternatively deep clean your airbrush makeup equipment.
People often complain about their airbrush getting regularly clogged. This can be because of two things, either they are using too thick base makeup or they are ignoring its proper cleaning.
When to clean your airbrush?
- First, When you are switching between colours you need to first clean and then put another colour. Otherwise, it will lead to the mixing of those two shades which will not give you a desirable look.
- And, When you are done for your day or keeping your airbrush at rest try to clean it then and there. It will increase the efficiency and the results.
But in today’s time where everyone is so much in rush, they do not have enough time to disassemble each and every part and cleaning it deeply.
Here we give you some quick guide:
How to clean your airbrush for the next use?
-
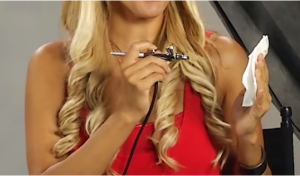
Step 1:
The very first and basic step is to head on the compressor, turn it on high (if air control is facilitated in the machine). Take a tissue paper and spray the entire product that is still remaining in the stylus.

-
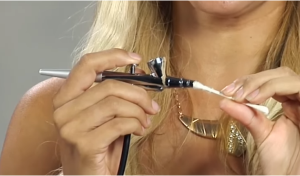
Step 2
Once you are done, take a cleaning solution (Ammonia free) and pour it in the stylus cup. Quickly grab a cotton bud and gently get inside and clean the stylus cup.

-
Step 3
Take back the cotton bud and quickly put it inside the nozzle and rotate it clockwise to clean it properly.
-
Step 4
Again we will repeat the step one. Take a tissue paper and spray the entire cleanser on it.
-
Step 5
Turn off your compressor and remove the back lid of your stylus. Gently lose the small nut and slid out the needle from the stylus. Take a tissue paper again and swipe it on the needle to clean any remnants of your excessive product.
 Slide back your needle back in the stylus and screw back the nut. Put back your back lid on the stylus.
Note: Before putting the back lid press the trigger of the machine to check whether the needle has been placed correctly and the screw is tight and ready for the next use.
Now your airbrush is ready for the next go in just 5 simple steps.

 Slide back your needle back in the stylus and screw back the nut. Put back your back lid on the stylus.
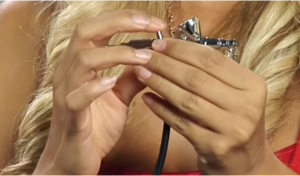
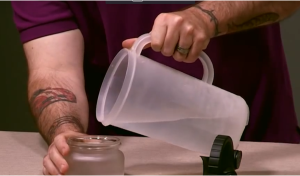
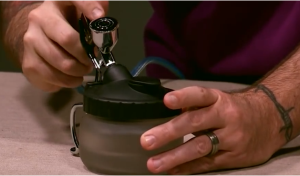
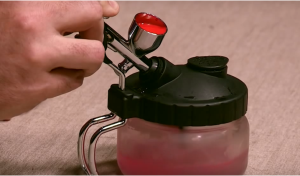
One of the other options for professionally cleaning your airbrush is by using airbrush cleaning pot.
Clean using Airbrush Cleaning Pot
Here are the steps:
-
Step 1
Fill the pot with the water for about ½ to 1 inch and close the lid very tightly.
-
Step 2
Place the airbrush stylus on the designated airbrush holder.Open the cap and pour the cleansing solution into the cup and mix it with a Q-tip with the product remain.
-
Step 3
Press the trigger and spray out the entire excess product in the pot. Repeat this action until all the colour is not drained out.
NOTE: This airbrush cleaning pot is mostly used when you need to switch between the colours or shades of foundations
 NOTE: This airbrush cleaning pot is mostly used when you need to switch between the colours or shades of foundations
Some basic tips from Airbrush Makeup Experts about Airbrush Cleaning:
- Many people sock their entire airbrush in the solution for quick cleaning but on the contrary, it can harm your machine. Socking your airbrush can make its bass core react with ammonia, dissolves paints to crystallize in odd – spots and even remove the lube which enables in smooth functioning of the machine.
- Regularly clean your airbrush before drying off the paint as it can further form blockage.
- Always use ammonia free cleansing solution. Although it is a great cleaning ingredient but it will react with the brass or chrome of your machine which can lead to building up of icky green substance inside your machine. It will also lead to peeling off of exterior chrome plating. All this will make your machine look dirty and unhygienic.
Hope this tutorials and instructions help you, if you have any suggestions or questions please ask in the comments section below.
Hi, I am Jay Maximus, the guy behind this website. I am an Airbrush Makeup Expert and founder of ‘Jay Maximus Airbrush Makeup Studio’, a Professional Makeup Studio in Manhattan, NYC. I write about Airbrush Makeup Tips and techniques here on this website. If you want to know more about me, you can click right here – “About Me“